Today I show how to make a Vietnamese Kite
Materials for one Vietnamese Kite:
- 12" square of covering material (see article for choices)
- Matchstick bamboo reed (selected from window blind)
- 1/2"-wide cellophane tape for Mylar or cellophane kite; or rubber cement or paste for paper version
- 22" piece of lightweight string for bridle
- Tail streamers (see story for choices)
Tools:
Scissors, pencil, ruler and nail or needle for punch
Instructions for plastic version
1 Fold and crease the kite cover as shown (pic. A). (Measurements are approximate; variations fly well)
2 Measure matchstick reed to fit the center crease from tip to folded base line. Tape this reed to the kite to form a spine, covering the reed completely. Bring bottom flap up over the reed and tape the edges down . Fold the corners of the tape to the outside nose as reinforcement (pic. B).
3 Measure a reed for the arch. Be sure this is a strong reed with a good symmetrical curve (pic. C).
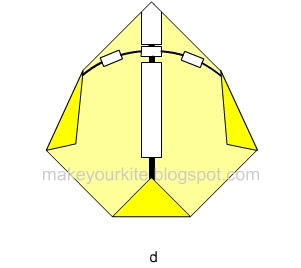
4 Tape the arch reed in place at the tips and the intersection with the spine. Cover the reed with tape in 2"-3" segments (pic. D).
5 Fold side flaps over the reed and tape there down (pic. D).
6 Turn the kite over (pic. E).
7 Poke holes for the bridle close to the reed. Tie the bridle string as shown, over the intersection of the reeds and over the spine 2" up from the base of the kite. Set the bridle by tying a loop. To find the correct angle, hold the kite by its string over your table. The spine of the kite should hang nose upward horizontal at about a 15-degree angle from the horizontal (pic. E).
8 Add tails keeping them balanced on each side (Keep some extra tail on hand for when you go flying). Tail streamers can be placed according to the character of the kite(fish or fowl?), the basic rule being balance - the same for each side. The arrangement shown is four strips of crepe paper, each measuring one inch wide and four feet long. Tails could also be of colored cellophane, scrap Mylar, plastic wrap or paper, even newspaper, for the completely recycled kite. (pic. E).
Instructions for paper version
All the steps are essentially the same as for the plastic kite except that you may substitute glued paper strips for tape. (See drawings) This method will give you a more classic version of the Vietnamese kite. The side corner flaps can be glued down directly without added strips. (The easy way is to glue one side first without trying to hold the arch in place, then glue the other side)
Fly!
The Vietnamese Kite does best in light to medium winds. If your kite dives or spins on the end of the line, add more tail - and enjoy!


Don't forget about this blog how to make a kite! See you in a week!
1 comment:
I'm Senior Editor for NHA Magazine (nhamagazine.com) and am very interested in using your "Make Your Own Vietnamese Kite" in an upcoming issue. May we have your permission?
Post a Comment